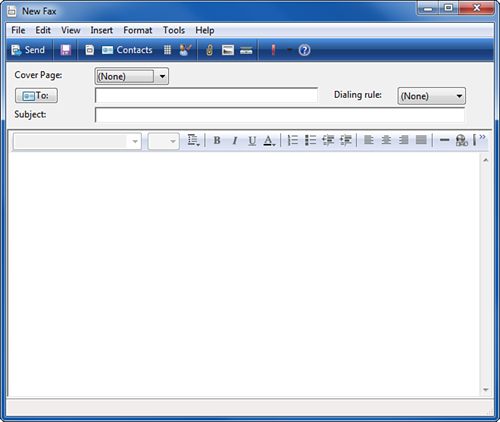
To send a fax with Windows Fax and Scan, click the New Fax button to open the New Fax dialog box, shown in Figure 1.
If your fax modem doesn’t work, check the following: Test the fax modem: To make sure your modem is working properly, open Control Panel. In the search box, type the word modem,
then select Phone and Modem. Enter your location information if it is
requested, and click the Modems tab when it appears. Select your modem
in the list of Modem devices, then click Properties, and select the
Diagnostics tab. Click the Query Modem button to send test commands to
the modem. If the modem
does not respond, check the modem listing in Device Manager; for an
external modem connected to a serial (COM) port, you should also check
the serial port section of Device Manager. If you see problems reported
with the modem or the port, view the device’s Properties to diagnose the
problem. If you have an external fax modem:
Check the modem’s power supply. If your modem is not connected to a
working AC adapter, or if the AC adapter is not plugged in to a working
AC outlet, your modem will not work. Some external modems have an on/off
switch. Make sure the modem is turned on before use. An
external fax modem must be connected to a working COM or USB port. A
COM (also known as RS-232 or Serial) port is a 9-pin male D-connector.
The cable between the modem and the computer should be secured in place
with the thumbscrews provided. Loose cables can cause the fax modem to
not work reliably. If you
have disabled the COM ports in your system BIOS, you must reenable them
before you can use an external modem. Check your system or motherboard
documentation for details. If
you are using a COM-to-USB adapter, make sure the adapter works
correctly. Problems with the adapter could cause your modem to appear to
malfunction. Frankly, we advise you to use only USB or internal devices
if you no longer have COM ports on your system. If a USB external modem doesn’t work, make sure the USB port is working. Attach a USB mouse to the port to check its operation. If you have an internal fax modem:
On a desktop PC, an internal fax modem slides into one of the available
PCI expansion slots. If the card is not properly seated in the
expansion slot, it may not work reliably. Click Start, right-click
Computer, select Manage, and select the Device Manager. Be sure that the
modem doesn’t have a yellow triangular ! warning icon by its name. If
it does, either it’s broken or you need to install driver software for
it. Try this: Right-click it, select Update Driver Software, and select
Search Automatically for Updated Driver Software. If this doesn’t work,
you may have to search for software on the manufacturer’s website. |
|
Selecting Recipients
To
send a fax to a recipient not on your Contacts list, enter the fax
number or numbers in the To field. If you want to enter more than one
recipient, use a semicolon to separate fax numbers. To send a fax to
selected recipients on your Contacts list, or to create a new contact,
click the To button to open the Select Recipients dialog box.
Windows
Fax and Scan can fax only to contacts that have fax numbers in their
contact information or to manually entered fax numbers. If you have
contacts that do not have fax numbers listed, you will need to enter the
fax numbers manually at faxing time or, better still, edit their
contact information to supply the fax number. If
the contact has a fax number listed, you might need to add the area
code or country code to the number to enable Windows Fax and Scan to
make the call. Use the same information as you would provide for a
standalone fax machine. |
|
Entering Text
Enter the subject of the
fax into the Subject field. If you are using a cover page and want to
add notes to the cover page, enter note text into the Cover Page Notes
field. The main text entry field is below a text-formatting toolbar
(refer to Figure 11.4).
Use this toolbar to change font and font size, select from predefined
text and paragraph styles, insert bullet points or numbered steps, and
align text.
Selecting a Cover Page
Windows Fax and Scan
includes four standard cover pages: confident, fyi, generic, and
urgent. To use one of these cover pages, or to select from a personal
cover page, click the Cover Page pull-down menu and select the desired
cover page.
Inserting Images, Text, and Files
To insert an existing
image file, place the cursor where you’d like the image to go and click
Insert, Picture. You can insert bitmap, JPEG, GIF, or PNG file types.
Navigate to the picture location, select the image, and click Open. The
picture is imported at the cursor location.
Note
The picture might appear to be too wide for the page, but Windows Fax and Scan scales it to fit on the page. |
To
insert a file attachment into the fax, click Insert, File Attachment.
Navigate to the file and click Open. The file is converted to fax pages
when the fax is received by a standard fax machine. (You must have an
installed application capable of printing this file.)
To insert text from a TXT
or HTML file, place the cursor where you want to make the insertion.
Click Insert, Text from File. Navigate to the file and click Open. The
text is inserted at the file location.
Tip
After inserting text, use the text-editing tools to delete any unwanted text or change text formatting. |
Adding Scanned Pages
To add scanned pages to
your fax, place the pages you want to scan into your scanner. Click
Insert, Pages from Scanner. The pages are scanned automatically and show
as an attachment. If your scanner does not have an automatic document
feeder (ADF), remove the first page after scanning it, insert the next
page, and repeat the process until all pages have been scanned. Each
scanned page is inserted as a TIFF file.
If your scanner doesn’t work, check the following: Test the scanner:
To make sure your scanner is working properly, start Windows Photo
Gallery, click File, and select Import from Camera or Scanner. Select
the scanner, and click Import. The scanner application should appear. Obtain WIA drivers: If the scanner does not respond, make sure you are using the correct drivers: Best: Windows 7 or Windows Vista drivers with Windows Image Acquisition (WIA) support Acceptable: Windows XP drivers with WIA support Not Acceptable: Windows 7, Vista, or XP drivers with TWAIN support only
Windows
Fax and Scan and Windows Photo Gallery use WIA to interface with the
scanner. With some types of scanners, the driver CD you receive with the
scanner may include only TWAIN drivers. TWAIN drivers can be used
through third-party applications’ Import menus, but they don’t work with
WIA applications. Visit
the scanner vendor’s website to download and install WIA drivers if your
scanner works with its own scanning application but not with Windows
Photo Gallery or Windows Fax and Scan. Note that some scanner vendors
include both TWAIN and WIA in their default driver installation routine. |
|
Previewing the Fax
After
typing and inserting all the information needed into the fax, click
View, Preview to see a preview of the fax. Alternatively, click the
Preview icon, which is just to the right of the Save icon on the
toolbar. Attachments are converted into text or graphics, as
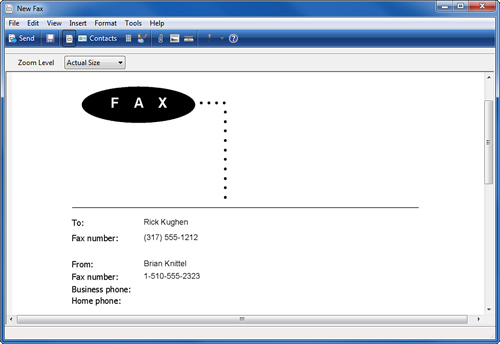
appropriate. Figure 2 shows a typical fax in Preview mode. Use the Zoom Level pull-down menu to select a magnification for review.
Click View, Preview again, or click the Preview icon again, to return to the normal fax-editing mode.
Setting Up Dialing Rules
If you need to specify a
prefix for an outside line, click the Dialing Rule pull-down menu (to
the right of the To box; refer to Figure 11.4),
and select My Location to use the location information you set up when
you installed your modem. If you are dialing from a different location,
select New Rule. When the Phone and Modem Options dialog is displayed,
click New and provide the necessary information.
If
you can fax from your office or home with a particular dialing rule (My
Location or a customized location), but you cannot fax from other
locations, such as a meeting room or hotel, you should find out what is
needed for a dialing rule and create a new one. If you will not be using
that location again, you can also specify the phone number manually and
add codes such as 9 (outside line) or a comma (each comma adds a
one-second pause) as a prefix to the destination fax number. |
|
Sending the Fax
To send the fax, click
Send. The fax is placed in the Windows Fax and Scan program’s Outbox
folder until transmission is complete. After the fax is transmitted, the
fax is placed in the Sent Items folder.
Monitoring Outgoing Faxes
After you click Send, a pop-up window (see Figure 3) appears, displaying the status of the current fax and previous fax events.
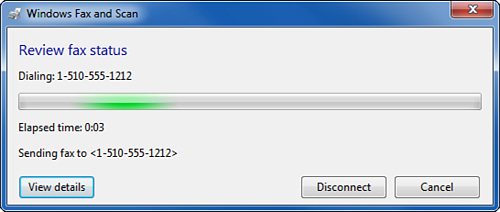
At the end of the fax transmission, a notification is also displayed over the system tray.
If
the fax modem doesn’t detect a dial tone, it can’t work. Make sure the
RJ-11 telephone cable is properly connected to the fax modem and to the
phone jack. Some fax modems use a pair of RJ-11 ports, one for the phone
line and one to permit a telephone to piggyback on the modem to share a
line when the modem is not in use. Make sure you connect your telephone
cables to the correct ports. A good way to start is to unplug the phone
cable from your modem and plug it into a regular telephone. Be sure the
phone gets a dial tone. Replace
damaged or suspect cables: If you’re like us, you probably have a dozen
or so unused RJ-11 cables lying around from various telephone, fax
machine, and modem installations. If
the fax modem connects to a Y-splitter or other line-sharing device,
try disconnecting the line-sharing device and cabling your modem
directly into the phone jack. A defective line-sharing device can cause
the fax modem to malfunction. |